The Life of Jennifer Dawn.. another linky party I have entered this post...

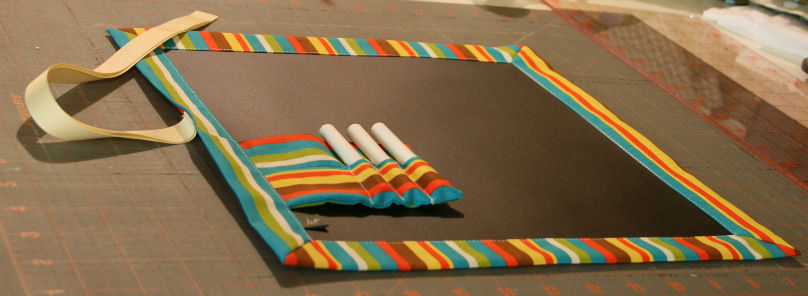
My mother gave my kids a roll up chalk board she made - yes she is crafty too. I had never seen chalk cloth before. It is COOL. After watching my girls fight over the chalk board, I decided I should make a couple more - and maybe try to sell some as well.
They have been pretty popular. What's not to love? They roll up and can be stuck just about anywhere. Chalk won't melt in the car (like crayons - yes I have melted wax in my van) or leave 'art' behind like markers (yep, I have permanent 'art' as well).
So, I thought I would share a little tutorial on how I make them.
There are several tutorials out there, none of which really covered how I wanted to make them. I was looking for something with limited supplies and had a nice mitered corner - I just like the way those look. I found this tutorial on self binding with mitered corners. Yay! Just what I was looking for.
Let's begin!
I start with a piece of main fabric 15.5" square and chalk cloth 11.5" square. If you have a fat quarter for the main fabric choice, some of the left over is used to make the chalk holder.
A piece of ribbon ~ 24"
3 pieces of fabric ~4x6" (for chalk holder)
Iron all 4 edges of the main fabric under - between 1/4 to 1/2 inch. I just eyeball this and try to make the edges as straight as possible.

Then I mark the corner 1.5" down from point and even length from each side with a disappearing ink pen (use your fabric pen of choice).

After each corner is marked, fold each corner - right sides together - so the edges of the marks align and a point is formed. Pin each corner.

Sew each corner along the line.

Trim fabric from corners.


Turn.

Press.

Insert chalk cloth.


Make chalk holder
The size of this changes with each one I make. I just use whatever scrap is available. They are usually about 4x6". I use 3 layers of fabric. Fold one in half with right sides OUT - this will become the front flap of the chalk holder.

Layer folded piece on top of second piece. Now place third piece right side down (to have right sides together).

Stitch around top, bottom, and one side.

Turn, press.

Top stitch lines to make individual slots for the chalk. I usually make 2-3 slots (each about 3/4" wide) for chalk and one larger slot for a piece of sponge, or paper towel.

Insert chalk holder into mat. Use Wonder Tape (double sided tape that washes away and WON'T gum your needles) to tape down all 4 edges of fabric to chalk cloth. Tape chalk holder in place as well. If you have a tag, don't forget to add it! I tried a few by pinning and it was not good. The fabric really shifted a lot against the chalk cloth - even when using a walking foot. So if you must use pins, make sure your pins only go through areas that are covered by fabric and use a TON of pins.

Stitch around edges of mat.

Stitch a piece of ribbon along the side of the mat (same side as the chalk holder), right sides together, on back, centered along the edge. Melt edge of ribbon (with a flame, a simple match works great).

And you are done!
I stumbled across this Pinterest board of LOTS more ideas for chalk cloth. I will likely be making some of these soon.
Have you every used chalk cloth before? What is your favorite project with chalk cloth?
Now go check out the other crafts here.

and here.

Your board looks so good! It would be a pleasure to write on it (me always being the consumer ;)
ReplyDeleteThis looks great, Jill! Thanks for sharing!
ReplyDeleteWould it be okay if I featured this over at ASWC this week?
Amy x
Great tutorial. I liked the concise directions and the great photos Now I can frame my little fall wall hanging neatly!!
ReplyDeleteI love them! My grand daughter is too young for them now, but at some point I will have to buy one! Your directions are very good too. very easy for anyone to follow.
ReplyDeletewhat a great idea! i was always enamored with chalk as a kid. how special to have your own (and not have to share with sister, either)! :)
ReplyDeleteThanks! These have been pretty popular this fall. My kids like each having their own. And I like they are easy to go in the car. :)
DeleteThis is genius! I'd love it if you stopped by my weekly link party and linked this post up. :) http://thelifeofjenniferdawn.blogspot.com/2013/01/a-little-bird-told-me-link-party-23.html
ReplyDeleteI just linked up! Thanks for the invite. I look forward to following your blog.
DeleteSuch a fun material.
ReplyDeleteThanks for your tutorial- I love it